If you manage your own web server and want to secure your website with SSL encryption (i.e., use “https://” URLs) you must obtain and install an X.509 certificate. Buying a certificate can be expensive, though, often costing upwards of US$100 per year. The cheapest option is to create your own, “self-signed” certificate for free. There’s a popular misconception that self-signed certificates aren’t as secure and that you must accept browser security warnings to use them; this is false. If securely distributed and installed in a browser, a self-signed certificate is just as secure as those sold by Certificate Authorities such as Verisign and will not cause browsers to display security warnings. This document attempts to briefly explain what certificates are, how to create a self-signed certificate that a browser can safely trust (i.e., no browser warnings), and how to use it without being vulnerable to man-in-the-middle attacks.
Background Information
Overview of SSL/HTTPS and X.509 Certificates
If you don’t know anything about SSL or X.509 certificates, a cursory explanation might be helpful. Anyone who uses a self-signed certificate should understand how it differs from one that’s purchased, especially in regards to the potential security risks. So what is an SSL certificate? In general, two things: 1) a form of ID, comparable to a passport or driver’s license; and 2) a public encryption key, which can be used to encrypt data such that only the owner of the certificate can decrypt it. In other words, an SSL certificate serves two purposes: identify the site that is using the certificate and secure communications with it.
The next important concept to understand is that one certificate can be used to “sign” other certificates. In layman’s terms, Bob can use his certificate to put a “stamp of approval” on other certificates; if you trust Bob (and his certificate), you can trust any certificate that he’s signed. In this scenario, Bob is referred to as a “Certificate Authority“. All major browsers come with a collection of certificates from trusted Certificate Authorities (again, Thawte and Verisign being common examples).
The last step is to understand how the browser uses certificates. At a high level, here’s what happens when you open “https://www.yoursite.com” in a browser:
- The web server will send its certificate to the browser.
- The browser compares the “common name” in the certificate (sometimes called the “subject”) to the server’s domain name. For example, a certificate being sent from “www.yoursite.com” must have a common name of “www.yoursite.com” or the browser will issue a warning message saying it can’t be trusted.
- The browser tries to verify that it can trust the certificate. This is comparable to a bouncer checking your ID for a hologram that proves its authenticity. Just as anyone can make a fake ID and try to steal your identity, someone can also create a “forged” certificate with a common name of “www.yoursite.com” which appears to belong to your site. In an attempt to confirm that the certificate can be trusted, the browser checks to see if it has been signed by any of the certificates in its collection of trusted Certificate Authorities. If the browser can’t find trusted “stamp of approval” that matches the one on the certificate, so to speak, then it presents a warning message to the user saying the certificate can’t be trusted. Note that the user may choose to ignore the warning and accept the certificate, anyways.
- Once the certificate is verified (or if the user ignores warnings and tells the browser to accept it), the browser starts encrypting data using the public key in the certificate and sending that data to the server.
Self-Signed Certificates and Man-in-the-Middle Attacks
The important thing to note about this process is that the browser’s first request to “https://www.somesite.com” might be intercepted by someone else who, in turn, forwards your request to the actual server (and similarly send responses from the actual server back to the browser). In this situation, an attacker can effectively “listen in” on all the communications between you and the server; this is known as a “man-in-the-middle” attack. If your browser is using the correct SSL certificate for “www.yoursite.com,” however, all the data is encrypted such that the attacker can’t make sense of it. The trick, then, is for the attacker to fool you into using their certificate (and therefore their public key); this way, your browser will happily encrypt data such that it can be easily decrypted by the “man in the middle.” And if this scenario sounds a bit far-fetched (i.e., “why would anyone sit around all day and specifically try to do this to my web site?”), consider that it is possible for malicious software to monitor random network traffic 24 hours a day and automate the entire man-in-the-middle attack.
If you set up a self-signed certificate incorrectly (i.e., you install it in your web server, immediately go to your new https:// URL, and ignore your browser’s warnings about not being able to verify the authenticity of the certificate) your site and the people who use it are vulnerable to this kind of man-in-the-middle attack. Remember that a self-signed certificate, as its name implies, is signed by you and not a standard, trusted Certificate Authority. In other words, your self-signed certificate doesn’t have a standard “stamp of approval” that the browser knows about. Therefore, it’s impossible for a browser–or a human, for that matter–to verify its authenticity.
To ensure that your self-signed certificate isn’t vulnerable to forgery, you should first securely distribute it to all the people who will connect to your site using SSL. In other words, transmit a copy of the certificate such that you’re not worried about someone tampering with it along the way. This might involve posting it on a secure file-sharing site, for example, or even giving them a physical copy using a disk. Next, the recipient of the certificate must install it in their browser as a “Certificate Authority” before connecting to your site. Once this is done, the browser can connect to “https://www.yoursite.com” and easily verify the authenticity of the certificate it sends back. This makes your site, and your free self-signed certificate just as secure as the expensive ones sold by commercial Certificate Authorities.
Self-Signed CA’s and Securing Multiple Domains
The instructions that follow explain how to easily create a single, self-signed certificate, and install it in the browsers which will access the site. However, if you need to secure more than one domain (including subdomains), this means you’d need to create, distribute, and install multiple certificates (i.e., one per domain). To avoid this annoyance, you can create and distribute a single certificate that can be used to validate the authenticity of all the certificates you create for other domains; this is referred to as a “self-signed Certificate Authority certificate.”
While using a “self-signed CA certificate” is certainly elegant if you need to secure multiple domains, it does require a bit more work and can be slightly more confusing. The instructions that follow will focus on the most common scenario, securing a single domain, by simply creating/distributing a single certificate.
Instructions
1. Create Your Self-Signed Certificate (UNIX)
Assuming you’re using a UNIX variant (including OS X), create a text file called “make_self-signed_cert.sh” with the following contents (note that you can thank Ron Bieber for this script):
#!/bin/bash
# make_self-signed_cert.sh: A script for making self-signed X.509 certificates.
# Original script created by Ron Bieber (www.bieberlabs.com)
HOSTNAME="$1";
if [ -z "${HOSTNAME}" ]; then
  echo "Missing hostname argument (e.g., www.yoursite.com)";
fi
if [ ! -e pass.key ]; then
  openssl genrsa -des3 -out pass.key 1024
else
  echo "Key already exists ... skipping ..."
fi
openssl rsa -in pass.key -out $HOSTNAME.key
openssl req -new -key $HOSTNAME.key -x509 -out $HOSTNAME.crt -days 999
Assuming you have OpenSSL installed (most UNIX installations do by default), here’s an example showing how it is used:
$ ./make_self-signed_cert.sh www.yoursite.com
Generating RSA private key, 1024 bit long modulus
.......................++++++
.......................................................++++++
e is 65537 (0x10001)
Enter pass phrase for pass.key:xxx
Verifying - Enter pass phrase for pass.key:xxx
Enter pass phrase for pass.key:xxx
writing RSA key
You are about to be asked to enter information that will be incorporated
into your certificate request.
What you are about to enter is what is called a Distinguished Name or a DN.
There are quite a few fields but you can leave some blank
For some fields there will be a default value,
If you enter '.', the field will be left blank.
-----
Country Name (2 letter code) [AU]:
State or Province Name (full name) [Some-State]:
Locality Name (eg, city) []:
Organization Name (eg, company) [Internet Widgits Pty Ltd]:
Organizational Unit Name (eg, section) []:
Common Name (eg, YOUR name) []:www.yoursite.com
Email Address []:
$ ls -l www.yoursite.com*
-rw-r--r--  1 clint  staff  1107 Jan 29 23:56 www.yoursite.com.crt
-rw-r--r--  1 clint  staff   887 Jan 29 23:56 www.yoursite.com.key
You can see in the example above that the script produces two files: “www.yoursite.com.crt” (the X.509 certificate) and “www.yoursite.com.key” (the private key). “www.yoursite.com.crt” contains a public key that can be used to encrypt data. The “www.yoursite.com.key” file contains the private key that’s used to decrypt data; you should take special care to keep this file safe and private. For the sake of illustration, here’s what you would see if you wanted to view the contents of these files:
$ cat www.yoursite.com.crt
-----BEGIN CERTIFICATE-----
MIIDBDCCAm2gAwIBAgIJALRtzXJhVHn+MA0GCSqGSIb3DQEBBAUAMGAxCzAJBgNV
BAYTAkFVMRMwEQYDVQQIEwpTb21lLVN0YXRlMSEwHwYDVQQKExhJbnRlcm5ldCBX
aWRnaXRzIFB0eSBMdGQxGTAXBgNVBAMTEHd3dy55b3Vyc2l0ZS5jb20wHhcNMDkw
MTMwMDQ1NjU4WhcNMTExMDI2MDQ1NjU4WjBgMQswCQYDVQQGEwJBVTETMBEGA1UE
CBMKU29tZS1TdGF0ZTEhMB8GA1UEChMYSW50ZXJuZXQgV2lkZ2l0cyBQdHkgTHRk
MRkwFwYDVQQDExB3d3cueW91cnNpdGUuY29tMIGfMA0GCSqGSIb3DQEBAQUAA4GN
ADCBiQKBgQCfIP0KqbZx5mo/jR2EmGITHgP1ctM5X6WenaiKnFtwpFVJ6gr6Cs4H
TO4SfZgPlFg8Ax8AwDWY+qUJajh2iof1L8rWQYddWfK1HVd16ngJdA4r2kffRlkn
0m5pui/0bCfEcAaOvmQa8tkzoDPK0xEmYmCA9gEwvH6ihJZ95au7RQIDAQABo4HF
MIHCMB0GA1UdDgQWBBRox9pM8xJyANFJ13bxOc7zmEo0ljCBkgYDVR0jBIGKMIGH
gBRox9pM8xJyANFJ13bxOc7zmEo0lqFkpGIwYDELMAkGA1UEBhMCQVUxEzARBgNV
BAgTClNvbWUtU3RhdGUxITAfBgNVBAoTGEludGVybmV0IFdpZGdpdHMgUHR5IEx0
ZDEZMBcGA1UEAxMQd3d3LnlvdXJzaXRlLmNvbYIJALRtzXJhVHn+MAwGA1UdEwQF
MAMBAf8wDQYJKoZIhvcNAQEEBQADgYEAFfyeP7XX9T0/7uPioABp4DiJO7pmhZLT
5hk2hUzNzN02IJTjqkMcwB5r7BZ5/6bQWqifVL8C/Zt/d/sg4ioCcqRJHWcLNdTr
A8kiQTAfIp98vnMWp+8Wcj5yLoBGpTvnmM1bNaSUlyExsxjul8VjPJ+K+oLR80ev
i8QGVXaEpww=
-----END CERTIFICATE-----
$ cat www.yoursite.com.key
-----BEGIN RSA PRIVATE KEY-----
MIICXQIBAAKBgQCfIP0KqbZx5mo/jR2EmGITHgP1ctM5X6WenaiKnFtwpFVJ6gr6
Cs4HTO4SfZgPlFg8Ax8AwDWY+qUJajh2iof1L8rWQYddWfK1HVd16ngJdA4r2kff
Rlkn0m5pui/0bCfEcAaOvmQa8tkzoDPK0xEmYmCA9gEwvH6ihJZ95au7RQIDAQAB
AoGAdO3LorM0ghubBRnPj+hdYMjUhd6bQXR8AcK93ySnuGy40zhsWnHoFMs9wU6S
lxgdgfOVK3sRp1i+Pt3ToZ+H6MVP7uZVy1MCCDHMi5MICmLmJ3pdo0CjHwXTyYTC
OY4pwMuSOmEHGLgDlkqD1wZfBG7a6kYwj5yCsgyOgLLGxCECQQDMqJvKpr8ViGXb
o7YM9/AQKdwfE81jG2OtoJV7ls/3gGKlwwROwyOYvSCw0tfuq5LjjeA06O3F5ad2
uEMnRTf5AkEAxwxpHZ0aKsORjX4zMQ2bgOy2xdWtOTQVFE3o3hP0fOL3+XbIC+eI
C885m6g88o7ons04j6mko1kmLlyNCdYorQJBAJJQwQDC8b3tRBUhF9hxsfl8U9kM
CTyfqkXJltVC3u/to5kqsXu1208pd6OzOZlypJN3LSHmnYdsRquD1M7Ql9ECQQCe
3pT3gfDkuPtvh46sVEQNfuHSvV1pDtzUO+rldd/p3e42Okwo1D+NzXQZfQpIPzAD
r6C5aZlylzEWR+B6PWhxAkAryRgQldWi8p10NqWCl7QYmHVW82cnHKP4HdjvrrsN
rYtUlcSMuvEH2pGITWP9YQ2l685l2qj3Qa33qn3RkBwf
-----END RSA PRIVATE KEY-----
2. Configure Web Server to Use the Certificate
Now that you have created a certificate with a public key, and a corresponding private key, you need to configure your web server software to use them. This typically involves moving the files to the correct directories and/or updating config files (shared hosting providers like DreamHost allow you to just paste the keys into an HTML form). See your web server documentation or use Google for information specific to your circumstances.
3. Securely Distribute the Self-Signed Certificate
If “www.yoursite.com.crt” had been purchased and signed by a Certificate Authority like Verisign, you wouldn’t need to do anything else after configuring your web server to use the certificate. But because this is a self-signed certificate, you need to do a little more work: find a way to securely send it to other people (i.e., without worrying about someone tampering with it during transit) so that they can install it before visiting your site. One easy way to do this is to publish “www.yoursite.com.crt” via an existing, read-only “https://” URL. For example, if you use a free file-sharing service like DropBox you could put “www.yoursite.com.crt” in your public folder and then send the link to anyone who needs secure access to your site; this allows them to download the certificate safely using the link. If you’re really paranoid, however, you could also burn “www.yoursite.com.crt” to a CD and mail it.
4. Ensure Users “Install” the Certificate in Their Browser Before Using HTTPS with Your Site
Once someone has an authentic copy of your certificate (“www.yoursite.com.crt”) they need to configure their browser to use it as a Certificate Authority (i.e., a trusted certificate that can be used to verify the authenticity of other certificates presented by web servers). After doing this, the user can safely go to https://www.yoursite.com and the browser will finally be able to verify that the certificate sent by the server is authentic. If a man-in-the-middle attack program were to successfully begin intercepting communications and send the browser a forged certificate, the browser could detect it and warn the user.
The method by which you configure a browser to use a self-signed certificate as a Certificate Authority depends, unsurprisingly, on which browser is being used.
Firefox
- Open the Firefox preferences dialog.
- In Windows select Tools > Options
- In OS X select Firefox > Preferences from the menubar
- Click on the “Advanced” menu button and select the “Encryption” tab.
- Click on the “View Certificates” button to open the Certificate Manager.
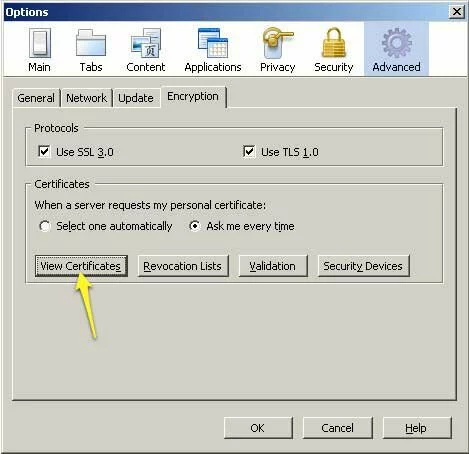
Screenshot showing how to access the Certificate Manager dialog in Firefox.
- Click on the “Import” button.
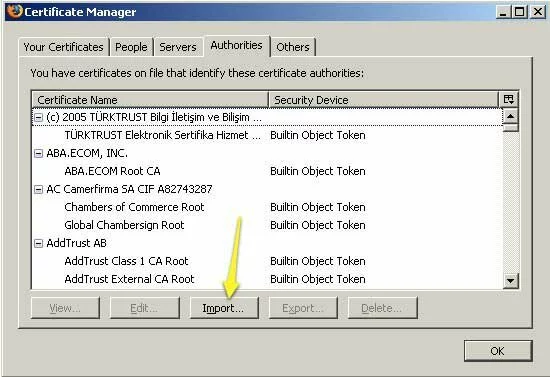
Screenshot showing the Certificate Manager dialog in Firefox.
- Find your certificate (e.g., “www.yoursite.com.crt”) on the file system and click “Open”.
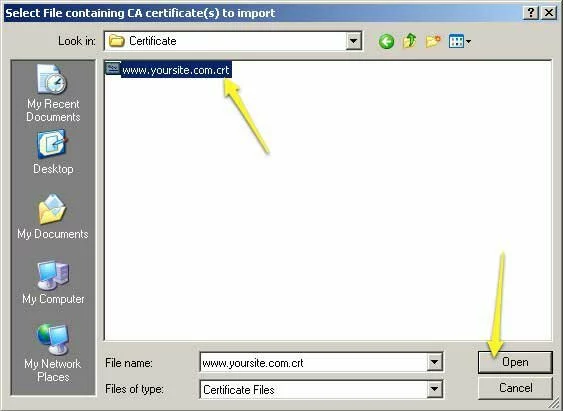
Screenshot showing how to select the certificate that will be imported into the Firefox Certificate Manager.
- Firefox will ask you how it should use the certificate. Select “Trust this CA to identify web sites” and click the “OK” button.
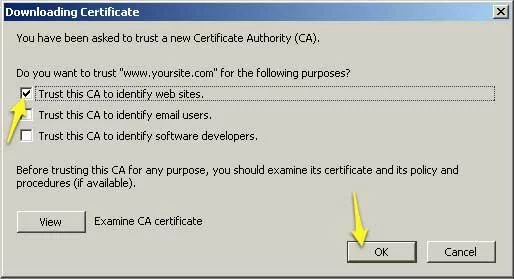
Screenshot showing how to configure Firefox to use your self-signed certificate as a Certificate Authority.
- After you click the “OK” button, you can scroll through the list of certificates and find the one you just installed. This is how you can modify or delete it in the future.
Internet Explorer
- Right-click on the certificate (e.g., “www.yoursite.com.crt”) and select “Install Certificate”
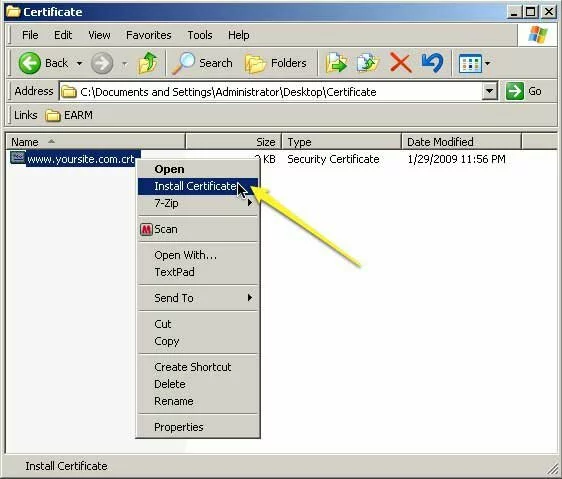
Screenshot showing how to begin installing a self-signed certificate for Internet Explorer.
- Once the “Certificate Import Wizard” begins, select “Place all certificates in the following store” and click on the “Browse” button.

Screenshot showing how to the first step in using the Windows "Certificate Import Wizard."
- Select “Trusted Root Certification Authorities” and click the “OK” button.
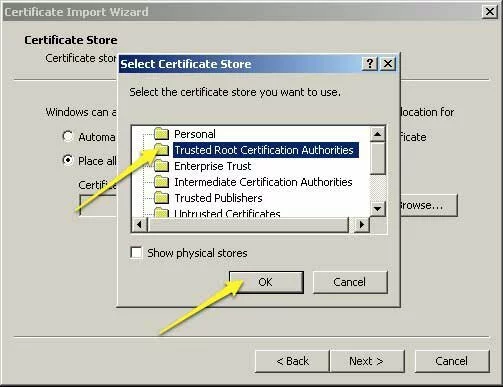
Screenshot showing how to specify that the Certificate Import Wizard should install the self-signed certificate as a Certificate Authority.
- The Certificate Import Wizard will display a warning message and ask you to confirm that you really want to install the certificate as a Certificate Authority. Click the “Yes” button.

Screenshot showing the warning / confirmation message displayed by the Windows Certificate Import Wizard.
Safari
- Start the “Keychain Access” program (the centralized repository for certificates used by Safari, among other things). You can find Keychain Access.app under Applications > Utilities.
- Select File > Import Items from the menubar.
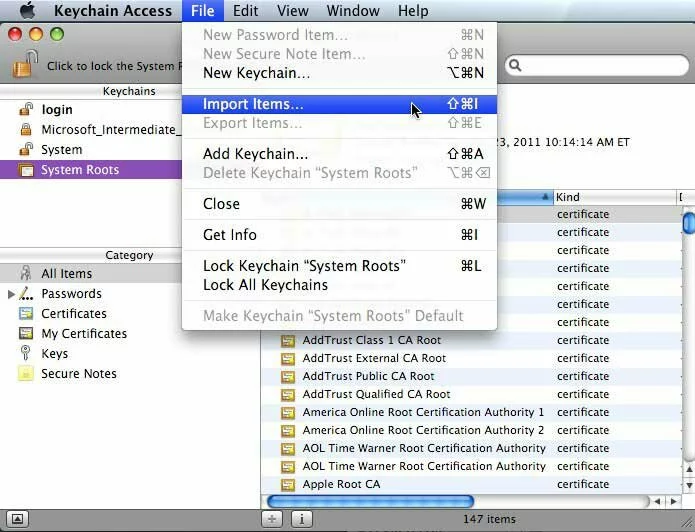
Screenshot showing how to being importing a self-signed certificate into Keychain Access (for use by Safari).
- Find your certificate file (e.g., “www.yoursite.com.crt”) on the file system, change “Destination Keychain” to “System”, and click the “Open” button.
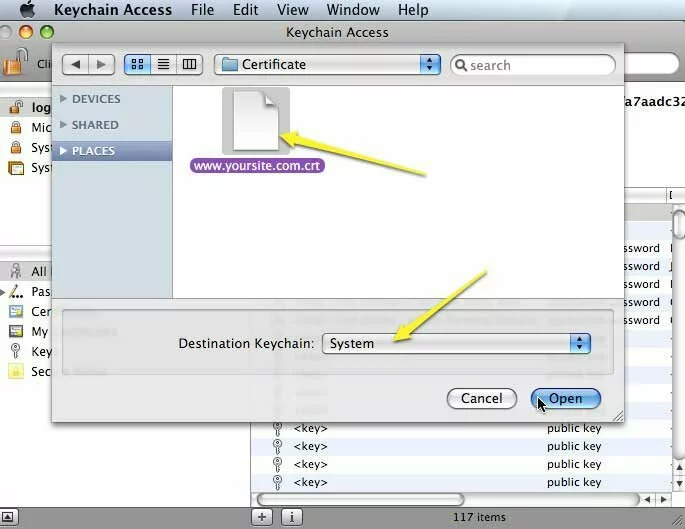
Screenshot showing how to import a self-signed certificate into OS X "System" keychain (for use by Safari).
(error: document truncated)

Pingback: Self signed certification for free and misconception about that - Geeky Derek